Oh Captain, My Captain (or, Mr. Evans, Ms. Atwell, I made you some hats.)

I just can’t stop making nerdy knitted gifts for famous people.

20160108_165204

There are worse problems to have, I guess.

20160108_170306

Wizard World Comic Con came to New Orleans this past weekend, and I was so ridiculously excited to go and meet Captain America himself, Mr. Chris Evans, that I was practically vibrating. The Captain America franchise is, hands-down, the greatest part of the already great Marvel universe, at least to me, and I wanted to make sure that I showed my love in knitted form to Chris Evans.

20160108_165900

20160106_161211

There were some mis-steps at first.

20151217_160726

But eventually I came up with something that I felt was ridiculously nerdy, yet classy enough to wear out in public like a normal person. Simply, wearing the Captain’s shield right up on top of your head.

20160106_161424

While staring down lovingly at your tiny Captain America Pop figurine, of course. No, it’s not creepy.

20160106_161602

See, he’s okay with it.

As the date neared, I realized that not only was this going to be a chance to meet Chris Evans, but that Ms. Hayley Atwell would also be there (In addition to nearly the entire Civil War cast, but I can only knit so many hats.) It was clear that my friend Bailee and I really needed to take advantage of this.

20160109_121545

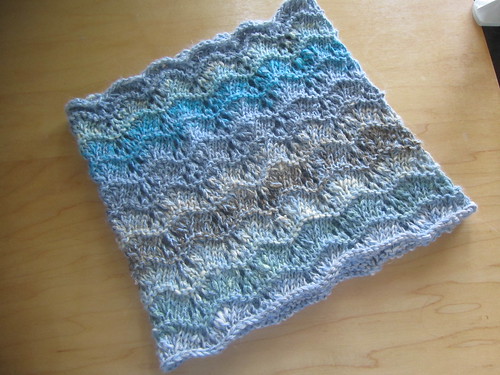
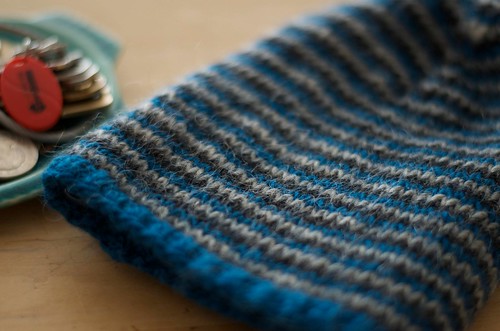
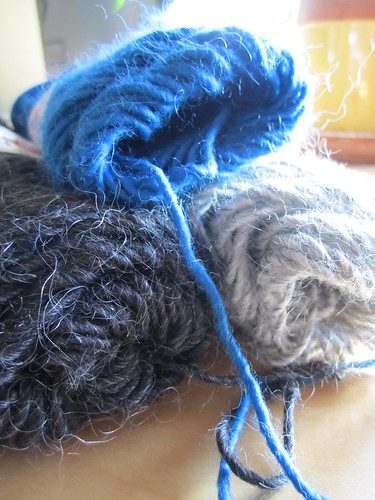
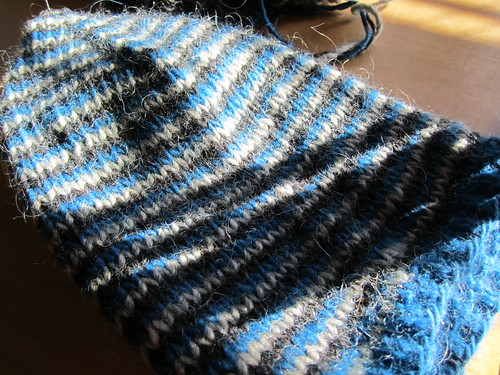
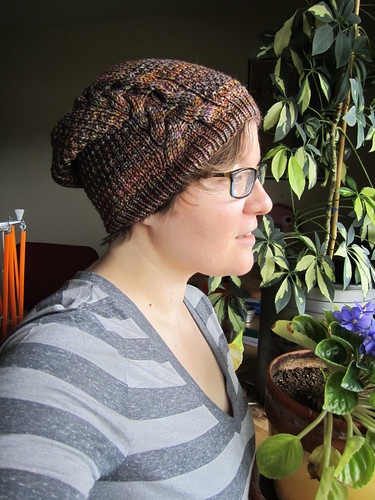
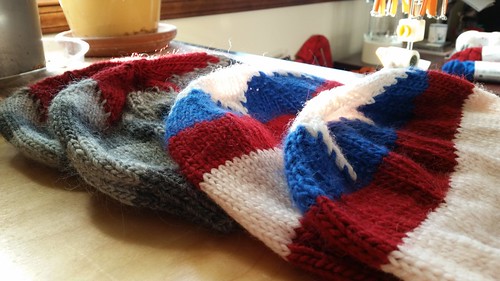
So now, we needed 4 hats, and I decided that a Winter Soldier/Bucky colorway would be a great idea, too, just so that I could sneak around in the open and wear my fandom a little more subtly.

20160106_161238

I’ve decided to call this original hat design “Oh Captain, My Captain,” because, oh man, I’d follow that guy to the end of the line. Want the pattern? Yeah, you do, especially in an easily printable PDF, right? Here you go!

—–

Some notes about the pattern:

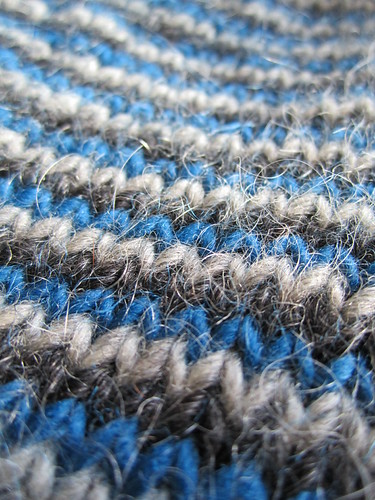
For the white section of the Captain America colorway, I had to use Brown Sheep Nature Spun Worsted since the LYS where I bought the rest of the yarn was unfortunately out of the white in Lamb’s Pride Worsted. Feel free to use whatever fantastic worsted-weight wool blend you’d like.

20151211_173911

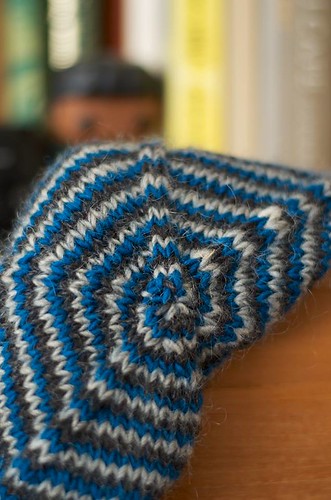
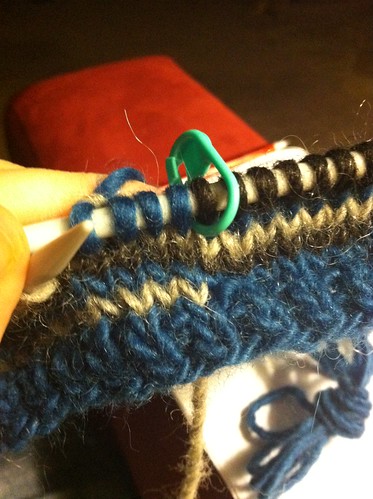
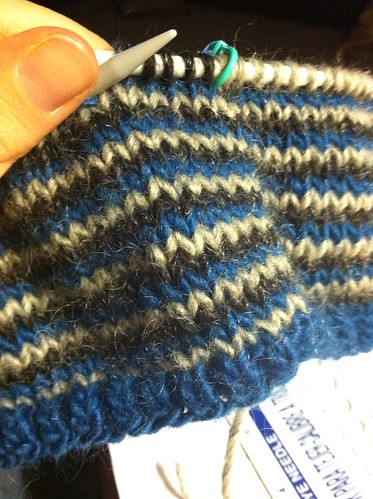
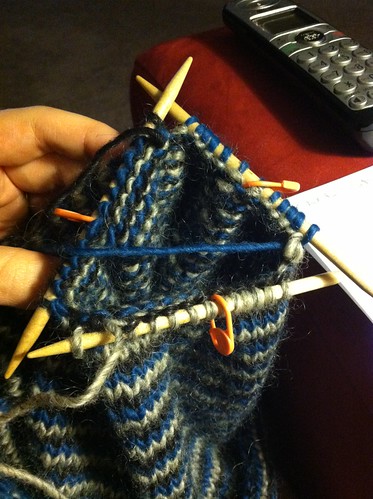
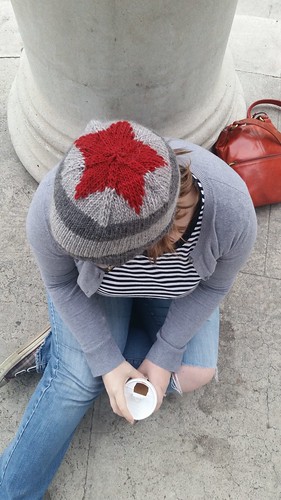
The “Star Crown” section combines fair-isle and decreasing at the same time, just to make things extra spicy. The easiest way to ensure that your fair-isle floats don’t get pulled too tight in all that decreasing? Flip your work inside and let the floats run around the outside of the hat. Just don’t pay much attention to the shape of the star in that picture, it’s from an earlier version where the star looked way too much like a flower. Lovely, but not what I was going for.

20151214_095315

Check that float action. Nice.

20151218_155006

If you’re using Lamb’s Pride, or anything other super-saturated wool blend, make sure that you add vinegar to your blocking water to prevent color bleeding in those red/white stripey spots. Otherwise, you’ll be rocking a red, pink, and blue flag up there on your noggin. Lamb’s Pride gives you great suggestions on how to do this on their label, so do give it a look.

20160106_161051

—–

So. On the day of the con, we were so excited to get into the Captain America: Civil War panel that we lined up 3 hours early. It was worth it.

20160109_102511

Pretty good seats, right?

20160109_102541

It was hard to even handle how much awesomeness was up there. The Russo brothers, Anthony Mackie, Frank Grillo, Hayley Atwell, Jeremy Renner, and My Captain. I mean, Chris Evans.

And honestly, I know I’m being very silly and fangirly about Mr. Evans, but I really do admire the man. He’s a huge supporter of Children’s Hospitals, and you all know how much that means to me as a pediatric RN. He has been really up-front about his problems with anxiety, and powers through media events like this one because of how much he enjoys his fans. He has helped a lot of people with their own anxiety issues (including myself) just by being honest and giving people permission to talk about it, which is pretty remarkable, considering that he’s in some of the most highly publicized movies ever made. What a gentleman. He really does deserve to be a superhero.

20160109_103054

He also looks really nice in a grandpa cardigan. Just saying.

20160109_103614

Anthony Mackie, a New Orleans native (who received a ridiculous amount of applause on this fact alone) was the most charming man in the world.

20160109_104238

Hayley Atwell gave thoughtful and impassioned responses to questions, and we all fell in love with her all over again. And Jeremy Renner was a grumpy old man, in the best possible way.

20160109_114824

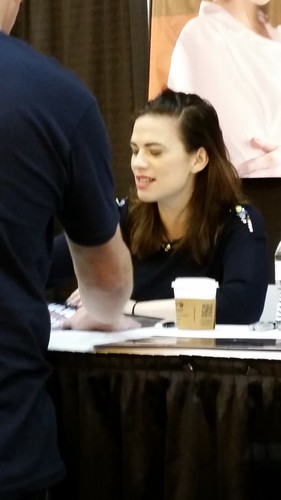
Bailee got an autograph with Hayley, and I wasn’t supposed to be taking pictures, but it was hard to resist.

20160109_115309

She was just so lovely! She and Bailee had an awesome chat about sharks while her assistant made angry eyes at me as I continued to ignore her.

20160109_142250

We got so much fun merch stuff, and now I have a Captain America pin, shirt, and poster to go along with my nerdy hat. I bought some Steve and Bucky Lego figures, too, while we were getting ourselves ready to meet Chris Evans. So freaking cute, even with that tiny machine gun.

Then, the moment of truth. We waited in line for about 30 minutes for our photo op, and once it started moving, I started panicking. The line was moving waaaaay too fast. It became clear that we would only be getting about 10 seconds in our picture, not nearly enough time to hand these wonderful people some hats and tell them how much they both mean to me.

20160108_155515

Luckily, I had the presence of mind to put the blog address inside all of the hats, so I basically could just throw them to them, which is sort of what ended up happening.

It was our turn, Bailee and I were both adorably wearing our Bucky versions of the hat, and I walked up and said, “I made you guys some hats!”

Chris Evans said, “Oh, cool!”

Hayley Atwell said, “Oh, I’m definitely going to wear this,” and tried to figure out how to get it on properly, but then the photographer was yelling at us to turn and smile.

cap and peggy

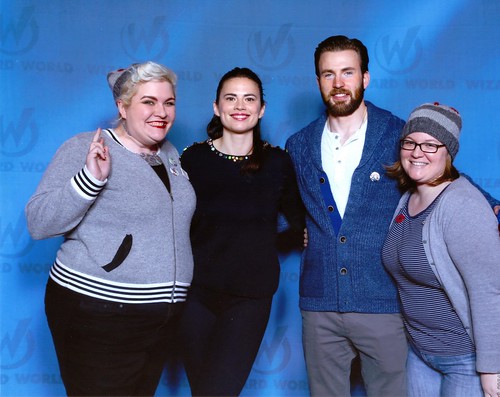
And then it was over. If you look way over in the far right-hand edge of the picture, you can see that Chris Evans is holding the hat, but unfortunately, not wearing it for the picture. Oh, and that hand holding the hat was definitely around my shoulders, and I don’t know if I’ve fully recovered from that quite yet.

We were smiling from ear to ear for at least an hour afterwards, rehashing the same 10 seconds over and over. Or maybe that was just me. If anything, I hope that the both of them take a little bit of time to click over here and see how much they are appreciated. To realize that someone enjoys their work so much that they are willing to speed-knit fair-isle with five-point decreasing just to show their love.

20160108_164921

Handknit love is the best kind of love, and I’ll never stop handing it out to those I appreciate and admire. Never.

Cowl Before the Storm

2015-05-17 197

Attentive readers (there’s got to be at least one of you, right?) will know that I made some super plain, yet super awesome socks last summer out of Noro Taiyo, one of the more stunningly beautiful and weirdly rustic yarns out there. These socks have proven themselves to be hardwearing and more than game for sliding around on the kitchen floor while I’m making pancakes. I also recently made a lovely, delicate lace shawl out of Misti Alpaca, the softest, most wonderful stuff to ever hover near your face. It’s like sticking your face into a pile of baby rabbits. Or baby alpacas, I suppose.

These yarns couldn’t have less in common, except for the fact that they both involve shades of blue. Why not put them together?

2015-05-17 078

Hot damn.

Admit it, you did that in your head like Bruno Mars’s super hip entourage, didn’t you? Me too.

2015-05-17 077

Introducing, in all of its wooly, silky, alpaca-y glory, Cowl Before the Storm.

You guys know I love puns, so here’s the explanation. A friend of mine once dyed her hair a lovely shade of lilac, and another friend of hers said that it made her look like a beautiful storm cloud. Before I ever even put these yarns together, I could see exactly in my head the beauty that they’d create. I was totally not disappointed. They merged into a lovely, light fabric that is super soft, yet very warm and cozy. Something about the light blue alpaca tempered down the wild color variations of the Taiyo, turning it into a beautiful storm cloud of my own.

2015-05-17 074

Especially that bright turquoise bit right there. Gets me every time. In fact, when I was working on it, a co-worker told me that it looked like the sky right before a storm, hence the name.

2015-05-17 205

Want to make your own? Find two wildly disparate yarns, stick them together, and read on. (Or, go ahead and click here to get the easily printable version, complete with less pictures of my face!)

Cowl Before the Storm
a beautiful little storm cloud of your own…for your neck!

2015-05-17 169

This is a very simple lace project worked in the round, fantastic for lace beginners or for those who love to play with color and texture combinations. You end up using very little of each skein of yarn, so you can save this project for when you need to have some fun with leftovers from other projects. The Lacy Scallops pattern is adapted for knitting in the round from the fantastic stitch reference guide Big Book of Knitting Stitch Patterns published in 2005 by Sterling Publishing.

Yarn:
Noro Taiyo Sock Yarn (50% cotton, 17% wool, 17% polyamide, 16% silk blend, 462 yds. per skein)
Misti Alpaca Lace (100% baby alpaca, 437 yds. per skein)

Supplies:
US size 8 (5.0 mm) 16-inch circular needle
stitch marker (to mark beginning of round)
tapestry or yarn needle
scissors

Gauge:
approximately 5 sts per inch on US 8 (5.0 mm) needles in Lacy Scallop pattern (Gauge is not terribly important here, as long as you don’t end up with a cowl hanging to your knees. Unless that’s your style, then go right ahead.)

Pattern:
CO 108 sts with both strands of yarn held together on circular needle. Join into round, being careful not to twist. Knit 1 row.

Begin Lacy Scallops pattern (adapted from Big Book of Knitting Stitch Patterns):
Round 1: *k1, yo, k2, sl 1, k1, psso, k2tog, k2, yo* until end of round (12 repeats total)
Round 2: knit all sts
Round 3: *yo, k2, sl 1, k1, psso, k2tog, k2, yo, k1* until end of round
Round 4: knit all sts
Round 5: purl all sts
Round 6: knit all sts

Repeat Rounds 1-6 eight more times, for a total of 9 repeats, easily tracked by counting the purled rows.

Knit Rounds 1-4 once more.

Bind off all sts purlwise. Break yarn and weave in ends.

2015-05-17 230

Block lightly, enough to open up the pattern and smooth out the scallops on the edges, but not so much so as to stretch or distort the shape.

2015-04-07 263

If you’re totally awesome like me, this is how much yarn you’ll have left over. And you’ll feel pretty smug.

2015-05-17 194

You earned it.

Triple Helix – a super mathy hat

spencer 6

People ask me to knit things for them relatively often, and I usually politely decline by explaining how busy I am. School starts up again tomorrow. (My final year of nursing school! I am so excited that this experience is drawing to a close that I am very nearly almost smiling as I type this. It’s a real moment.) Once school starts, all I tend to do is study, work, sleep, and complain about studying, working, and sleeping. It doesn’t leave much room for recreational activities, hence the overload on knitting projects and ice-cream-based dessert blogging this summer.

2014-07-29 006

However, there was a particular project that I knew that I had to finish before the summer was over. My friend and co-worker Spencer had asked me to make him a hat sometime last winter, and after a great deal of pretending like I didn’t want to do it, I got started with gusto.

Spencer is a math person. He makes jokes about the Monty Hall problem and never stops to see if you understand, just assumes that you will, because otherwise why would he be talking to you? That kind of person needs a mathy hat.

spencer 2

(He’s also a photography person, coincidentally, and the exceptionally lovely first, third, and fifth pictures in this post are all his. Beautiful stuff.)

How do you make a mathy hat, you ask? You take a deep breath and fall down into the rabbit hole of helical knitting. You remember that you saw that the amazing Grumperina knitted some helical striped socks a few years ago, and you dig through your stash to find something that works.

2014-07-29 044

I decided to go all out with the helical goodness here. Three rows of ribbing, three colors of continuously spiraling helical striping, six-part decreasing in order to create diminishing hexagons in the spiral as it works its way up? This thing is practically an episode of Schoolhouse Rock. Three is a magic number, indeed.

spencer 1

Want the pattern? Keep reading below, or go ahead and click on this handy link for an easy-to-read printable PDF.

2014-07-29 046

Triple Helix
a super mathy hat

This original hat was made to fit heads up to 24″, and changes in size can be made easily by decreasing/increasing the number of stitches cast on in multiples of six.

Yarn:
Brown Sheep Lamb’s Pride Worsted (85% wool, 15% mohair blend, 190 yds. per skein), 1 skein each of M-75 Blue Heirloom (Color A), M-03 Grey Heather (Color B), and M-06 Deep Charcoal (Color C)
(Really, any good quality worsted-weight wool or wool blend will do.)

Supplies:
US size 8 (5.0mm) 16-inch circular needle
US size 8 double-pointed needles
stitch markers (in at least 3 different colors or styles)
tapestry or yarn needle
scissors

Gauge:
5 sts per inch on US 8 (5.0 mm) needles

Pattern:
CO 108 sts with Color A on circular needle. Join into round, being careful not to twist.

Knit in 1×1 ribbing (k1, p1) for 2 rounds.

Using stitch markers, divide stitches evenly into 3 sets of 36 sts. I found it helpful to use stitch markers that were all the same color here, in order to differentiate from the marker you’re using to mark the beginning of the round and the stitch markers that will be used later to indicate the decrease sections. Using 3 distinct colors or styles will help to prevent a lot of confusion down the line.

2014-07-29 284

For the setup round, knit the first 36 sts with Color A. When you reach the first stitch marker, drop Color A, join Color B and knit with it until the next marker. At this marker, drop Color B, join Color C and knit until you finish the round.

2014-07-29 281

For the next round, continue knitting with Color C until you reach the first stitch marker. Then, drop Color C, pick up Color A (where it was conveniently left for you), and begin knitting to the next marker. Resist the temptation to twist the colors at the marker or to pull aggressively at that first stitch. Just drop the color you’re working with, pick up the one waiting for you, give it a tiny tug to even out the tension, and get going. You’ll continue to do this same maneuver over and over again, spiraling the colors upward in rounds until the piece measures 6″ in length (or whatever your preference might be). Keep in mind that the last color for each round always ends up being the first color that you use for the next round, so there’s no color-switching as you go past the beginning of the round.

2014-07-29 288

Decrease section:
Now, divide your sts further so that you have 6 sets of 18 sts each. It’s easiest to do this by just dividing each section in half with a different color of stitch marker, especially if you use locking stitch markers so that nothing has to come off the needles.

Decrease round: *ssk, k to 2 sts before next marker, k2tog, slip marker* until end of round, while continuing to switch colors at the appropriate stitch markers. (12 sts decreased, 96 sts remain.)

Plain round: k all sts, continuing to switch colors at the appropriate stitch markers.

Repeat these two rows 7 more times, until 12 sts remain, switching the double-pointed needles when appropriate. Use the gaps between the needles to stand in place of your color-switching stitch markers.

2014-07-29 293

Final decrease round: *ssk, k2tog* until end of round, while continuing to switch colors at the appropriate stitch markers. (6 sts decreased, 6 sts remain.)

Break all yarns, leaving long enough tails to weave in for Colors B and C, and a longer tail for Color A. Tuck the strands for Colors B and C into the hole at the top of the hat so that they are on the inside. Thread Color A onto a yarn needle and pull the yarn through the remaining 6 sts on the needles, pull snugly, and secure to the inside of the hat.

2014-07-29 011

Weave in all ends, and then spend a few minutes staring lovingly at that awesome spiral. Finish the hat by thoroughly washing and wet-blocking it, which will ensure that the tiny ribbed section stays flat and that the color-switching areas settle down. When the actual knitting is taking place, these areas might feel stiffer or tighter than the surrounding fabric, but a good blocking makes it all even out nicely.

2014-07-29 003

Now, go pretend that August is a reasonable time to wear a wool-and-mohair blend knit hat and go show it off. Not everyone might know right away that it’s a hat that displays your spectacular math love, but the right people will.

A Study in Subtlety – Stone Molly

2014-07-21 010

About a month ago, I saw a beautiful skein of Malabrigo Rios sitting in a basket in a yarn shop in New Orleans. (The Quarter Stitch in the French Quarter. And yes, before you ask, of course you should go. It is small and colorful and packed with amazing things and friendly, helpful people.)

2014-07-17 014

It was relatively unassuming. Just pale and brownish, a bit of a pastel rainbow going on. The color name listed is Piedras, spanish for “stones.” It reminds me of smooth river stones or collections of seashells. Items that seem drab and brown from far away but reveal rainbows of color on closer inspection.

Dan was skeptical, but I saw that it was going to knit up into something special. Something that would show off that hand-dyed splendor for which Malabrigo is known and coveted. However, it’s also some pricey stuff, so only one skein went home with me.

2014-07-17 024

While it was sitting on the swift, being wound, I noticed those beautiful rainbows even more.

2014-07-17 023

I mean, look at that! It’s not screaming out to be noticed, but it’s so pretty that I can’t even stand it. What do you do with only one skein of a yarn like that?

2014-07-17 025

2014-07-21 051

If you guessed make a fabulous slouchy hat with lots o’ texture, you are right! Meet Stone Molly.

The pattern is Molly from the very talented Erin Ruth at knit me a song. I can’t pretend that the name didn’t draw me in, as this particular combination of colors plus pattern name makes me think of Molly Hooper from Sherlock. (Let’s all pretend that my post title didn’t give that away.) It doesn’t appear as though her blog is still up and running, which is a shame, because this hat is an engineering marvel.

2014-07-21 052

First off, you are working in two different stitch patterns that have two completely different row counts. The mistake ribbing (or waffle stitch, if you want to make yourself hungry while talking about your knitting) has a 3-row repeat. The cable has an 8-row repeat. Completely non-divisible and yet totally balanced. Genius.

2014-07-21 055

Secondly, the decreases in this hat are deliberately placed in order to interrupt the stitch patterns as little as possible. They only take place on knit rows so that the purl stitches in the ribbing track all the way up the crown. There are no attention-grabbing spirals or squares, just fields of purls and cable that inexplicably get smaller and dwindle towards the top. It would have never even occurred to me to do such things.

2014-07-21 053

Thirdly (and in my opinion, bestly), the cable pattern does not just unceremoniously cut off once the decreasing begins, which is something that happens often in lesser hat patterns. This cable subtly tapers down until it melts into the background, and when the hat is on, the effect is of a wide cable that evenly decreases all the way up to the top of the head. And also, just one cable element to be worn rakishly off to the side? Yes, please!

In order to make this hat with only one skein of Malabrigo Rios (which clocks in at a generous 210 yds., normally fantastic for a hat, but maybe not for one with so much texture and slouch), some modifications did have to be made, but I was sure to incorporate these as seamlessly as possible into the original pattern. I fought the good fight in trying to make the whole thing with just one skein, but I ran out of yarn with only 5 decrease rounds to go, and all that beauty was certainly not going to be sullied with the clumsy addition of another yarn for the top. I did some math, ripped things back out to the appropriate point, and soldiered on.

Now, in order to knit this as I did, you have to go and download the original pattern because it is so much genius, and you definitely want to support those designers that make these beautiful, elegant things, yes? Then take a look at my changes as follows:

The original pattern states, “Repeat Rnds (1-3) 18 times more.” Instead, I only did 15 repeats of the entire sequence, ending up with Row 2 instead of Row 3 of the cable pattern. This way, the ribbing section remains intact and only the cable crosses need to be moved around within the crown decrease section. I know this doesn’t make much sense without the pattern in front of you, but that’s why you went and downloaded it, right? Right.

Now for those decreases. Only some of the rows deviate, and this is only to offset the cable crosses so that they remain the correct proportions for the cable to decrease seamlessly into the crown. Here are the way that those rows should now read:

Row 5: P1, k12, p1, knit to end
Row 6: P1, C6F, C6B, p1, knit to end
Row 11: P1, k8, p1, knit to end
Row 12: P1, C4F, C4B, p1, knit to end
Row 15: P1, k8, p1, k2, (k2tog, k3) to last 4 sts, k2tog, k2
Row 16: P1, C4F, C4B, (p1, k1) to end
Row 19: P1, k4, (p1, k1) to end

And that’s it.

2014-07-21 023

The combination of all that texture and the subtle rainbow striping of the yarn results in a hat that looks like a rich coppery brown from afar, but reveals hidden rainbows of color close-up. Not to toot my own horn too much (but really, what else is blogging but that?) I feel like this was the perfect marriage of yarn and pattern, and I can’t wait for the fall so that I can wear it everywhere.

Baxter the Bunny, a new super-squishable friend.

I promised some bunny action last time, didn’t I?

2014-01-02 080

Here’s Baxter!

My brother’s girlfriend, now fiancée, Kim, had expressed a desire in getting a stuffed bunny ever since she saw the infamous David Sedaris owl. I figured that Christmas-time was probably the perfect time to make that happen, but when I was searching for patterns, I had a hard time finding something small and squishable, yet full of potential personality. Nothing had that perfect proportion like the original owl pattern did of fatness and plumpness, while still having enough room for an expressive face, although some things came really close.

2014-01-02 092

Enter Big Cuddly Bunny by one of the all-time greatest knitting sites ever, the Purl Bee. Purl Soho’s blend of whimsy, retro style, and good old-fashioned solid crafting is always right on point. Their giant crazy bunny was going to work just fine, but he just needed to be miniaturized.

2014-01-02 073

Here are my pattern changes, so that you can make your own tinier, yet still super cuddly, version for yourself. BIG GIANT NOTE HERE: I am not claiming the genius of the Purl Bee to be my own. I am only posting my pattern modifications for this particular project. Please go visit them to get the original pattern if you wish to partake in the bunniness.

2014-01-02 088

Trip wishes that he could, but being without thumbs makes the knitting kind of difficult. He’ll just settle for biting everything instead.

2014-01-02 072

First off, our materials are obviously slightly different. I used Cascade Yarns Ecological Wool, color 8085, the leftovers from my totally awesome, yet seldom used (because I just know that the cats will eat it somehow), Hemlock Ring Blanket. Way less than one skein’s worth, obviously. I used double-pointed US 7 needles as well. And you’ll need some black and white felt for Baxter’s quizzical expression, along with white and black sewing thread.  The gauge is somewhere along the lines of 4.5-5 sts per inch, but the main goal is just to get a sturdy fabric that won’t stretch out of control when stuffed.

Now for the real changes.

During the “THE BOTTOM” section, change Round 13 to *P6, kfb, repeat from * to end of round. (64 sts)
Then, go on to Round 14: Purl.
Round 15: *P7, kfb, repeat from * to end of round. (72 sts)
Purl 6 rounds.

Changes to “THE BODY”?
First, start by knitting 35 rounds.
Round 36: *K7, k2tog, repeat from * to end of round. (64 sts)
Rounds 37 & 38: Knit.
Round 39: *K6, k2tog, repeat from * to end of round. (56 sts)
Rounds 40 & 41: Knit.
Round 42: *K5, k2tog, repeat from * to end of round. (48 sts)
Rounds 43 & 44: Knit.
Round 45: *K4, k2tog, repeat from * to end of round. (40 sts)
Rounds 46 & 47: Knit.

2014-01-02 087

Follow the rest of the finishing steps detailed here, except you obviously won’t need a whole bag of stuffing. Just stuff your bunny up plump as you can. You’ll be able to add in the last bits of fluff before you close him up, so don’t worry if you can’t get it all in there right now.

2014-01-02 074

No changes to “THE BUNNY’S LEFT EAR.” Just do that all as written.

2014-01-02 084

The only change for “THE BUNNY’S RIGHT EAR” takes place when you are reorienting your stitches to get to the second ear. Since we ended up with more stitches at the top than the original pattern, you’re going to have 10 stitches between the ears on either side of the top of the bunny’s head, meaning that a total of 20 sts are not being used to make the ears. Just knit the ear as stated, making sure that you have left the proper amount of stitches in the middle to close up the bunny’s head, and only using 10 sts to make the ear.

2014-01-02 086

Make perfect sense? It will when you have it in front of you. I promise.

After making your second ear, go ahead and top off your bunny with the last amounts of stuffing and kitchener him closed. I did not do any duplicate stitching for the ears, because I didn’t feel as though Baxter was in a particularly cutesy mood. He’s more of a sedate, cool, woodsy bunny, even though he does look a little anxious.

2014-01-02 082

After that, cut out all your felt pieces and sew them on with gusto, just like you did with your owl and carrot. Didn’t make those? Just take tiny stitches, and be sure to hide all of your knots on the inside of your work. I find that stitching the pupils onto the eyes first makes things a lot easier. Make sure his teeth are slightly crooked, and you’re all good to go!

2014-01-02 078

Wait! Don’t forget to make the pom-pom tail! I bought my very first pom-pom maker for this, and I have to say, it was an extremely enjoyable experience. Something about that fat, plump pom-pom is very satisfying, especially since I have only been able to turn out limp, floppy ones in the past. The thing I am getting at here is — go and buy a pom-pom maker right now. Even if you don’t use it much, it will make your life better.

2013-12-29 112-1

And you will make someone else’s life better when they receive their new squishy friend.  Now, go make a bunny and make somebody happy.

Russell the Carrot, your new best knitted friend

2013-08-05 004

My friend and coworker Stevi had a baby last winter, and I never got a chance, what with school and all, to make her new baby boy anything fun. However, as my summer draws to its close, this problem has been officially solved.

Meet Russell the Carrot. Russell is a fantastic orange friend who will add joy to your life. Not only is he good for your eyesight, but he is extra huggable and squishable, and has a smile for every occasion. Apparently, Stevi’s son is really into hugging, and he loves anything with a smiley face, so Russell should be right up his alley.

2013-08-05 005

I had the (rare) presence of mind to write all of Russell’s creation down as I was making him, so I am presenting his pattern here for all to enjoy. When I was searching for knitted and crocheted carrot patterns originally, I was a little discouraged to see how tiny they all were, because we were looking for something big enough and durable enough for lots of play. I think that Russell will fill that void nicely in the knitting world.

For his eyes, I went ahead and tried to do something similar that I did with Mr. Sedaris’s Owl, and came up with something that’s halfway between Heidi Kenney (Are you familiar? You should be.) and the Muppets. I feel like that’s a pretty good place to be.

Here we go. Want a clean and easily printable PDF? Just click here.

2013-08-05 010

Russell the Carrot
a knitted carrot friend

Yarn:
Peaches & Cream Cotton in color 1628 – bright orange (but any worsted-weight cotton will do)
small amounts of worsted-weight green and red yarn for carrot leaves and smiley face

Supplies:
US size 5 (3.75 mm) double-pointed needles (Gauge is not the most important thing in the world here, but you want to make sure that the resulting fabric is tight enough to not allow stuffing to poke through. I got about 6 sts per inch with this particular yarn and needle combination.)
Size F/5 (3.75 mm) crochet hook
tapestry or yarn needle
polyfill stuffing
scissors
white and black felt for eyes
sewing needle
sewing thread in black and white

Abbreviations & Definitions:
m1: Pick up the bar between the st just worked and the next st, and place it on the LH needle. Knit into the back of this loop to inc 1 st.

ssk: Slip the next 2 sts as if to knit. Insert the LH back into the front of these two sts and knit them together to dec 1 st.

k2tog: Insert the RH hand needle through the front of the next 2 sts as if to knit and knit the 2 sts together to dec 1 st.

For all crochet stitches and abbreviations? The internet is a much better resource than me for this, trust me. I am not so good at explaining those. Have fun with Google.

Carrot Body:
CO 3 sts. Keep these 3 sts on one double-pointed needle, and knit in I-cord for 2 rounds, pulling the yarn across the backs of the sts to close the resulting “tube.”

Divide the 3 sts onto 3 separate needles.

Round 1: *k1, m1* 3 times (6 sts)
Rounds 2-6: knit all sts
Round 7: *k1, m1, k1* 3 times (9 sts)
Rounds 8-12: knit all sts
Round 13: *k1, m1, k2* 3 times (12 sts)
Rounds 14-18: knit all sts
Round 19: *k1, m1, k3* 3 times (15 sts)
Rounds 20-24: knit all sts

2013-08-05 012

Round 25: *k1, m1, k3, m1, k1* 3 times (21 sts)
Rounds 26-30: knit all sts
Round 31: *k1, m1, k5, m1, k1* 3 times (27 sts)
Rounds 32-36: knit all sts
Round 37: *k1, m1, k7, m1, k1* 3 times (33 sts)
Rounds 38-42: knit all sts
Round 43: *k1, m1, k9, m1, k1* 3 times (39 sts)
Rounds 44-48: knit all sts
Round 49: *k1, m1, k11, m1, k1* 3 times (45 sts)
Round 50: knit all sts
Round 51: *k1, m1, k13, m1, k1* 3 times (51 sts)
Round 52: knit all sts
Round 53: *k1, m1, k15, m1, k1* 3 times (57 sts)
Round 54: knit all sts
Round 55: *k1, m1, k17, m1, k1* 3 times (63 sts)
Round 56: knit all sts
Round 57: *k1, m1, k19, m1, k1* 3 times (69 sts)

2013-08-05 017

Rounds 58-65: knit all sts

This is a good time to start stuffing. Make sure you use something to get that stuffing all the way down into the carrot point, like a chopstick or the eraser end of a pencil, before you fill it up too much. Keep stopping to stuff the carrot intermittently as you go through the following steps to ensure a firm, but squeezable, carrot friend.

Round 66: *k1, ssk, k17, k2tog, k1* 3 times (63 sts)
Round 67: knit all sts
Round 68: *k5, k2tog* 9 times (54 sts)
Round 69: *k4, k2tog* 9 times (45 sts)
Round 70: *k3, k2tog* 9 times (36 sts)
Round 71: *k2, k2tog* 9 times (27 sts)
Round 72: *k1, k2tog* 9 times (18 sts)
Round 73: k2tog all the way around (9 sts)

Break yarn. Put in your final bits of stuffing, pushing it down as far as possible. Thread the remaining sts onto a yarn needle, and draw the yarn through the sts, pulling them tight to close the top. Fasten yarn securely with a small knot, if necessary, to keep the hole closed. Weave in ends.

Carrot Accoutrements:
Attach green yarn to top of carrot, using the top “ring” of sts that you pulled closed, with crochet hook and a slip stitch. Make a series of chain sts of about 3-4″ long (or however long you want). At the end of the chain st row, turn back by skipping the first 2 chain sts and making double crochet stitches in every following chain st. Because the crochet hook used for this is much smaller than customarily used for worsted-weight yarn, the strips of double crochet will corkscrew around themselves, resulting in fun, curly carrot leaves.

2013-08-05 014

At the end of the row, when you get back to the top of the carrot, secure the strip by slip stitching into the top “ring.” Then make another strip! I made five of these, varying the lengths slightly throughout, and that seemed to fill in the top nicely, but you can make however many you want. Just be sure to finish the last strip by slip stitching into the top of the carrot. Then break your yarn and draw it through the last loop, pulling tightly. Weave in ends.

Cut small circles of white and black felt for the carrot’s eyes, and sew them securely onto the carrot. Just pick whichever of the three sides you think is the prettiest. I sewed the black “pupils” of the eyes onto the white circles first, and then attached the entire thing afterward, just for ease of handling. Make sure you knot everything securely and pull the ends of the thread through into the stuffing so that they can’t work loose.

Embroider a big smile onto your carrot using your yarn needle and red yarn, using back-stitching to get a nice smooth curve. In order to keep the stitching from pulling out, I was sure to thread my yarn through the stuffing (with the knot on the outside of the stuffing) before beginning and finishing the stitching. Keeping the knot on the outside of the stuffing will make it much harder to pull through, but keeps the yarn hidden inside of the knitting.

Hooray! You are done! Be pleased with yourself and your new carrot friend.